


Did you notice a temperature change when entering the home?
Test temperature at the nearest vent (using hand or preferably a Infrared Thermometer) then verify the current settings on the thermostat
Step 1: Turn Off the Thermostat
Set the thermostat to the "OFF" position.
Wait for the system to completely shut down before proceeding.
Step 2: Inspect the Thermostat Wiring
Carefully remove the thermostat's face cover to access the wiring.
Check the wire colors. Standard colors are:
White, Green, Yellow, Red, Common (for standard systems)
Orange/Blue, Black, Brown (for heat pump systems)
If the wire colors don’t match the standard code, take a picture for reference.
Step 3: Locate the Air Handler (Inside Unit)
Ask the customer: “Where do you change your air filter?” This helps identify the air handler’s location.
Use the filter location to determine where the air handler is:
Floor (covered by a grate): The air handler is likely in a crawl space under the house or in a package unit outside.
Ceiling: The air handler is typically in the attic.
Wall: The air handler is usually in a closet, a nearby room, the basement, or in a package unit outside.
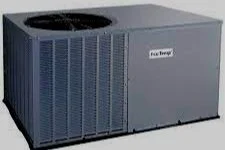
Note: Identifying a Package Unit
A package unit is much larger than a condenser fan and contains all system components in one unit.
Check outside the house before entering—you may spot a package unit easily.
Don’t have proper wiring (common wire) R, G, Y, W, C
Or R, G, Y, W-W2, C, O, B
(If no C wire can be used, refer to C adaptor)
Unit is not in reasonable condition (If no C wire can be used, refer to C adaptor)
Don’t have Wi-Fi (Only to territory’s that this rule apply) Territories will be added in the future
Not Eligible
After reviewing your system, I'm unable to install the thermostat today. As the state program continues to evolve and improve, we expect your system will soon be compatible. We’ll keep you informed and notify you when an installation is possible. Thank you for your understanding, and have a great day!

(If Eligible proceed to next page) If not eligible, notify resident as follows)

Step by Step Protocol
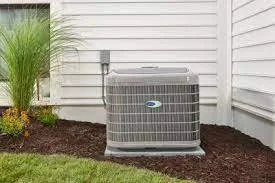
1. **Inspect the Outdoor Condenser Unit**:
- Examine the condenser for dirt or debris on the coils. Note the general condition to estimate the system's approximate age (e.g., wear, rust, or model indicators).
- Prepare to provide feedback to the resident based on the condenser’s condition.
2. **Enter the Home and Engage Resident**:
- Request the resident to switch the thermostat to the opposite setting (e.g., from heat to cool or cool to heat).
- While waiting for the system to activate, share your observations about the condenser:
- If the condenser is dirty, recommend a professional cleaning to improve efficiency.
- If the condenser is in good condition, praise the resident for maintaining it well.
3. **Check System Functionality**:
- Use your hand or an infrared thermometer at the nearest vent to verify if the system is producing the expected temperature (cool air for cooling, warm air for heating).
- Confirm whether the system is functioning correctly based on the temperature output.
4. **Determine Eligibility**:
- If the system is working properly, proceed with any further steps for installation or evaluation.
- If the system is not functioning, inform the resident they are not currently eligible for the thermostat installation. Use the following message:
**Not Eligible Notification**:
(Sir, Ma’am)
After assessing your system, I’m unable to install the thermostat today as it’s not functioning properly. As the state program continues to evolve, we expect your system may become compatible soon. We’ll notify you when an installation is possible. Thank you for your time, and have a great day!
5. **Conclude the Visit**:
- Thank the resident for their cooperation and provide any additional recommendations for system maintenance, if applicable.